 |
| 90 + 10 |

Sunday, May 26, 2013
Florida Wetlands, by Carol Schiff
I believe the wetlands of Florida are some of the most beautiful areas in the state, and sadly, some of the most underrated.
Tuesday, May 21, 2013
Visit to Sedona


There is a beautiful arts and crafts village called Tlaquepaque, and after only four days I finally learned to pronounce it.
posted by Carmen
Sunday, May 19, 2013
Day is Done by Carol Schiff
It is early evening in the Florida marsh and the sun is just about to disappear.

www.carolschiffstudio.blogspot.com
 |
| 90 + 6.50 in US |
www.carolschiffstudio.blogspot.com
Wednesday, May 15, 2013
Catching up on Mondays
by Kathy Garvey
We Pieces of 8 are away a lot in the spring and summer but when even a few of us get together at the Guild, we are enjoying our time together and doing "our thing" which varies in so many ways for each of us that it's always fun to see what everyone is up to. And we have a lot to catch up on if we've missed a week or two. I missed all of April but am so glad to be back and surrounded by such talented friends.
I've made a summary of May 6th and May 13th in pictures. Not everyone is included in the photos who was there working. But here's a little of what was going on. Carmen was with us on the 6th and did an amazing ocean view that she discovered looked equally enchanting turned upside down. I have to be fast to catch Carmen because she gets off to a really fast start each Monday and is always finished with at least one painting before we wrap up three hours later.
 On the other hand, Denette is so careful at planning, drawing and then painting that it can look like I've taken the same picture at the beginning as at the end. She has the patience that I envy. She can spend an hour on a very very minute section of a painting, and it shows in the final image.
 Carol and Donna returned from their adventure and Carol Nelson Workshop in New Orleans full of new techniques. Donna demoed one using Styrofoam plates for the starting design, and Carol started and completed a really beautiful panel using the same technique right before our eyes.
 I started on the 6th with a computer project I was working on to build a tutorial in Illustrator using the beautiful graphic style of Alphonse Mucha. The following Monday I was waiting for some more Mucha references to arrive in the mail so I worked on an acrylic named "I swear, the thing just grew on me!" (Hope it does by the time it's finished.)
 Mary carefully constructed a drawing for a complex watercolor that I'll post next week.Can't wait until next Monday to see what we are all up to. (Click on any picture to enlarge.)
We Pieces of 8 are away a lot in the spring and summer but when even a few of us get together at the Guild, we are enjoying our time together and doing "our thing" which varies in so many ways for each of us that it's always fun to see what everyone is up to. And we have a lot to catch up on if we've missed a week or two. I missed all of April but am so glad to be back and surrounded by such talented friends.
I've made a summary of May 6th and May 13th in pictures. Not everyone is included in the photos who was there working. But here's a little of what was going on. Carmen was with us on the 6th and did an amazing ocean view that she discovered looked equally enchanting turned upside down. I have to be fast to catch Carmen because she gets off to a really fast start each Monday and is always finished with at least one painting before we wrap up three hours later.


Sunday, May 12, 2013
Home Again, Home Again
Well, we are back from Louisiana tired but happy. We learned so much from this workshop, not only about new techniques but about experimenting and trying new things. Carol uses mostly Golden products but because she uses so much product she has learned how to substitute what comes in those little jars for artists with products that come in larger quantities from her favorite store Home Depot. We used MDF board as supports, Tyvek paper, Red Rosin paper, Elastometic Custom patch, Stucco patch and MM metal paint to name a few.
My head is spinning with all that we did. We slathered, painted, cut, pasted, glued, ironed and banged. It won't be until I review my notes that I remember what we used different materials for but one technique I do remember was easy and fun. We made our own marbleized paper with shaving cream.
All you need is some shaving cream, a foam plate, acrylic paints and some paper. Carol uses copy paper or deli paper that is waxed on one side, anything really. You can use the paper for a collage you are doing or to wrap a little present or just to see how wonderful the colors look together. This will make you smile and say Ahhhh! guaranteed.
Fill the foam plate with shaving cream about 1/2" thick and then smooth it over. Just like frosting a cake.

Choose two or three colors you would like to see together and put about four drops of each on the shaving cream. Space the drops out. Use the wooden end of a thin brush or something thin and tapered to swirl a pattern in the shaving cream


Place a sheet of paper over the shaving cream and press gently all around and smooth it with your hands. Do this for about 30-60 seconds and peel paper off.

Ahhh!! You have your own marbleized paper.
Enjoy and have fun!!
Donna Vines
FREE FALL, 12x12 Abstract on Gallery Wrap Canvas
 |
| 175 + 15 in US |
 |
| detail This reminds me of a view of clouds and the sea as seen from outer space. On another note, I have just returned from a Carol Nelson mixed media workshop in Lacombe LA. What a fun and informative week! Carol is adorable and a talented instructor and her art is even more amazing when viewed in life! I cannot wait to begin experimenting with the techniques she taught us. |
www.CarolSchiffStudio.blogspot.com
Wednesday, May 8, 2013
Carol Nelson Workshop
On Monday we started our four day workshop, the real reason we are in New Orleans this week. (The gumbo and Po' Boys were just a bonus.) Carol Nelson is an talented, innovative artist who is always trying and sharing new techniques and to be in one of her workshops is sheer pleasure.
Day One we did a great piece using Styrofoam plates and supports. Carol came across this method when she discovered that she really liked her mixing palette at the end of the day and tried to think of ways to incorporate it into a piece.
Of course there is a lot more to it than that but it shows you what an innovative thinker she is and what a great sense of color and proportion she has.
Day Two was sort of "found objects" and collage day. Carol makes beautiful collages, specializing
in metal finishes, with an almost industrial feel.

This is one of her metal looking pieces with objects, metal finish, and stamping on it. She uses anything from buttons to bottle caps.
Day One we did a great piece using Styrofoam plates and supports. Carol came across this method when she discovered that she really liked her mixing palette at the end of the day and tried to think of ways to incorporate it into a piece.
Of course there is a lot more to it than that but it shows you what an innovative thinker she is and what a great sense of color and proportion she has.
 |
| This is one Carol did to demonstrate her technique to the class. |
Day Two was sort of "found objects" and collage day. Carol makes beautiful collages, specializing
in metal finishes, with an almost industrial feel.

This is one of her metal looking pieces with objects, metal finish, and stamping on it. She uses anything from buttons to bottle caps.
Tuesday, May 7, 2013
New Orleans
Saturday was our first full day in New Orleans. We celebrated by doing a tour of a few plantations. Our favorite was a Creole plantation named Laura. We had an excellent guide, Jacquline, who knew a lot about the plantation, how it was run, the family and even the building itself. We found out that Cajun women had the right to inherit so this plantation was run by the women in the family for three generations. Not only did the first of these women turn it into one of the most profitable sugar plantations in the South, she married a nobleman right off the boat from France, got him to sign over his chateau and winery to her and made him sign a pre-nup too!!! What a woman. After the tour we were directed to a local restaurant for lunch and had some great Cajun food with some interesting stuffed alligators looking on.

Laura Plantation - A Creole style house
Donna Vines

Laura Plantation - A Creole style house
Donna Vines
Sunday, May 5, 2013
An Illustrated Pear: A Loaded Pear
Posted by Kathy Garvey
In my continuing efforts to study Illustrator CS6, this pear was sort of a summary or test to see what I could do with all of the stuff I now knew how to do. I just had fun with it. I started with my basic pear shape but decided to give it a sort of steampunk look so I used the Appearance palette with several fills to get some leather and metal looks. The leaf needed to be a little odd too. It was created by cutting the edges of my usual leaf with the knife tool and then I blended the same shape from the darker color to the lighter color to give it some dimension.
 The pear needed some equipment, because what is a steampunk pear without equipment? I added an eyeball and miscellaneous items around the exterior using gradients and basic shapes. I created some gears using a variety of methods. It took a while to build the bandolier, even though it was easy to create all the casings with a blend, positioning them correctly was very manual. However, it only took a few minutes to fill them with flowers by alt-dragging them into place. I added a small pedestal for the pear to balance on.

Next it needed some finishing touches. I had some odds and ends of steampunk like items around the house, including a bolt marked 64k(?) and a very old but non-functioning Bulova watch. Using gradients, blends and some of the wonderful effects so easy to apply, I made an attempt at duplicating them to add to the already existing equipment. The bolt seemed like it would make a perfect stem.

 Steampunk is not steampunk unless you really load on the STUFF. I thought there was room for a pocket to hold extra things so I built one. I stole a pear from one of my other studies to add to the pocket. (Making this probably the first cannibalistic pear illustration EVER!) I mocked up a map and magnifier with a pre-magnified view of the pear texture behind it. Shading and highlighting is something I usually save for Photoshop. But, using recently learned Illustrator techniques of creating highlights with the same color in Screen blend mode and the shadows with the same color in Multiply blend mode, I gave it a try. Loved it. (Used it again to add a little patch holding something-I'm not sure what it is-in a small empty spot on the top right of the pear.) The stitches are just a dashed stroke.
 Once everything was built, I added the background and a small tag certifying that this pear, despite the bandolier of flowers, is perfectly balanced and therefore nothing to be afraid of. (Click on any illustration to enlarge it.)
 Of all the pears so far, I think this one is my favorite. All the little things were a challenge and I probably spent 8 or more hours creating it. But it makes me smile when I look at it.
I'm still having fun with Illustrator CS6. Next: An Illustrated Pear: 3D Pear
In my continuing efforts to study Illustrator CS6, this pear was sort of a summary or test to see what I could do with all of the stuff I now knew how to do. I just had fun with it. I started with my basic pear shape but decided to give it a sort of steampunk look so I used the Appearance palette with several fills to get some leather and metal looks. The leaf needed to be a little odd too. It was created by cutting the edges of my usual leaf with the knife tool and then I blended the same shape from the darker color to the lighter color to give it some dimension.


I'm still having fun with Illustrator CS6. Next: An Illustrated Pear: 3D Pear
Wednesday, May 1, 2013
NOLA bound
On Friday fellow Pieces, Carol Schiff and I are leaving for New Orleans to attend a Carol Nelson workshop. Getting ready for a workshop is an exciting thing. There is the anticipation of starting a new adventure. The promise of learning. Learning about new techniques, new mediums, new people, new processes and maybe new beginnings. It is a jumping off point if your are in a rut or an extension if you are in the groove.
There is also the practical side. Getting ready. There is always a list of supplies and no matter how much "stuff" you have your will always need something, which is half the fun of getting ready. There are usually trips to an art supply house, decisions on what you might need that's not of the list but looks too interesting to pass up. Of course once you get everything plus the little extras you might need there is the final decision of how much you can practically take. This is the hardest part and every time I pack to go somewhere I think about all those pioneer women and how did they get everything they needed into those covered wagons?
Here is a photo of my supplies for the workshop and I am very, very proud of myself.

Donna Vines
Subscribe to:
Posts (Atom)
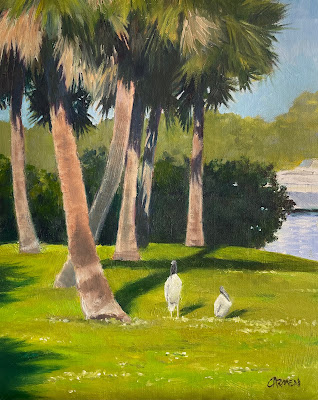
Ballard Park, Original Oil on Canvas
I had not painted outside in two years, so this was quite a challenge. It was one of those paintings I had to improve upon in the studio. ...
-
 Checking the Chicks 24 x 24, on salvaged tin ceiling tile unframed, ready to hang I'm having a little too much fun lately w...
 -
 My good friend Vincent Lamb is a wonderful nature photographer and I am a proud owner of a number of his fine photographs of Florida flora a...
 -
 Hello Pieces of Eight fans. I am the newest piece and my name is Phillis Holland. I was lucky enough to join this wonderful group of eight ...