Sunday, April 28, 2013

A Few of my favorite artists at the Melbourne Art Fest today!

by Kathy Garvey

I just spent the morning at the Melbourne Art Fest in downtown Melbourne and there are so many wonderful artists for this juried show that the work is almost overwhelming. Even so, there were six artists whose work I found so wonderful and their attitude so engaging that I asked if I could photograph them with their work to post here. If you weren't able to get to the show,  I'm adding links where possible to their work so you can see more.

The first really fun artist and her work that I encountered was Andy Striewski of Fort Pierce, Florida. Andy's work, which she terms "architectural constructions" is so fun to look at. She gathers odds and ends, assembles them into wonderful three dimensional objects, paints them with layers and layers of paint and the end result is fascinating for me. Unfortunately, Andy does not have a web site for me to link you to.
 Next, I encountered Janet Searfoss. Janet does batiks - with an enormous amount of exquisite detail in them. And Janet was so much fun to talk to about her work. She engages with everyone who enters the booth and was just delightful. She and her husband, Harold, came all the way from Greenville, South Carolina. She was so cute posing in front of one of her handsome owl batiks in a way that almost looked like she was sprouting wings. Janet has a beautiful website explaining her process and showing a beautiful gallery of her work. Click here to visit it.
 I was captivated by Peggy Engsberg Furlin's very graphic watercolors on canvas. The colors - all very soft washes of browns, greens and mauves - and sense of design really appealed to me and she was also very easy to talk with about her work. You can see more of Peggy's works and learn more about her by clicking on this link.
 I was thrilled to see Joyce McAdams at this show. I had encountered her work at the Cocoa Beach Art Festival last year and was entranced by her mixture of beautifully painted papers and fabrics. It's always fun to browse the booth of an artist whose work you love. Joyce has a beautiful website that's a must visit by clicking on this link. You will be totally inspired as I am.
An artist whose work I hadn't encountered before really caught my eye. This is Patrick Pierson of Palm Beach, Florida and he's a skilled painter with fun surreal topics. I was also impressed with how he talked about his work with visitors to his booth. Patrick has a lot of his work online and you can start by visiting his work at www.planetzootopia.com. I highly recommend it. Such fun you are going to have if you visit!
 Last but not least, I found Bob Osborne. Absolutely loved his very graphic watercolors and the beautiful textures in them. Bob is from Amelia Island, Florida and many of his topics are fish and birds - but oh what delightful fish and birds! I'm linking you directly to his giclee gallery that has a good view of his works I love. From there you can see his other beautiful fish paintings. Click here.

There were at least 40 other artists whose work I just think is wonderful but I chose these six not only because I find their work extremely well executed and graphically beautiful, but because they were so engaged with the customers visiting their booths. I love that. I always leave an art show thrilled with the beautiful work I've encountered and very glad that I am not the one standing in a booth all day. I couldn't do it. It takes a truly talented person to get into a juried show; it takes a truly marvelous personality to successfully work a juried show. These six artists were top on my list and I appreciated their willingness to pose for a picture while they were in the middle of such a busy day. If I've provided a link, I hope you will check out their web sites. They are all worth a visit.


SAND CRAB STAND OFF by Carol Schiff Studio

This little guy was not going to run, but stand his ground and fight!  I took a quick photo and left him alone.

SOLD


I had to count to make sure I had the same number of legs on both sides.......and I do as two of them are not easy to see


If possible, I like to have a little connection between the art and it's surrounding items.

Here in Florida, it is beach weather again.  Time for another beachy photo shoot!


Friday, April 26, 2013

Drying Off, 6x6 Oil Painting

I returned to my Everglades photos for this one. We were on the Anhinga Trail, and there was this Anhinga. There are a zillion paintings of these birds with their wings spread, letting their feathers dry. I thought this was much more interesting and funny, with all those unruly feathers sticking out. I would have named it "Ready for My Closeup," but that is the name of another painting I'm working on, which will be in the Pieces of 8 upcoming show, "Black and White and Red All Over."
posted by Carmen

Wednesday, April 24, 2013

On a Safari!

Mondays with the Pieces are always fun but especially so when we do a group activity.  This week I copped an idea from the wonderful Ellen Lindner of Adventure Quilter who shared a great way to train our eyes.  On her newsletter she discusses a photo safari in which she "searches" for photos that meet specific criteria.  (Her link provides a wonderful list.)  With apologies to Ellen and a nod to our time constraints, I modified the list a bit to suit our intent.  One rule was that since we were to stay inside, we could not "set up" poses or move things around. 

Can you guess what this is?  We have painted in these rooms for years and trust me, we found stuff we never knew was there.  This photo was "something from an unusual angle".  Relax, it is not alive.  But what an eye opener this exercise was.  We downloaded our 5 things and then critiqued as a group.
Isn't this fabulous?  Such a tiny pile of hanging chains noticed by Denette and captured perfectly with her MACRO setting.  Ah yes, we discovered that most of us needed more familiarity with our cameras including learning how to turn off the flash, move to a macro setting, focus when zooming....
This first appeared as a textured grey blob that looked like manatee skin (zoom in until unrcognizable) and then we saw the photo as above (zoom out til just able to identify).  Can you identify?  The top of a plastic water bottle in the sunlight.  But for artists those exquisite drops of water and lovely blue/lavendar rim would be enough inspiration to take off on.
Here's another zoom in....and even if you cannot guess what it is (most painters can) you have to admit that it would be a great start for an abstract, no?  Yes, it is the reflections in the curved side of a shiney metal pot.  Can you see my friend Bill in it?
This piece actually fulfilled several requirements: high contrast, be interesting in black and white, unusual angle and......

We accomplished quite a bit this morning and it certainly opened our eyes to a lot of things.  Ellen says she uses this when she is stuck or has quilter's block and I now see why.  It is be an excellent way to "play" outside while searching for new inspiration. All of us agreed that this activity is definitely a "do over" and no doubt we will be adding many new things to the list we work from.  Thanks Ellen!

p.s. if the links to Ellen's work do not come through in your copy please go to www.adventurequilter.com.  You will enjoy her creative take on fabric art.


Sunday, April 21, 2013

LAVA FLOW by Carol Schiff

I have been working on a new "to me" technique.

75. + 6.50 in US


Although it will never replace my representative painting, I find it interesting and exciting and a little like play time.......a nice change of pace.


www.CarolSchiffStudio.blogspot.com

Thursday, April 18, 2013

Monday, Monday II

It did take us awhile to settle down because Cindy had lots of tales to tell today.  She has a milestone birthday coming up and has decided to reset her odometer and not quite face it yet.  We will be celebrating it next week but she will be away in the mountains at her beautiful nest when the dreaded day actually arrives. (I heard Bob (her hubby) is bringing a case of wine, earplugs and a pith helmut.)
Cindy has a really fun ongoing "Saint" series she has been working on over this past year.  Today she brought in Saint Patti of the Potters to work on.  These paintings make you smile just looking at them.  They are loosely based on friends of hers and their hobbies and interests or any other inspirations Cindy has.


Fay was very quiet and intent today on her project.  As soon as we discovered what she was up to ohhs and ahhs were heard all around,.


Her collage called for a very exact nautilus shell shape and once it was cut out it looked so perfect and fit in so well.  Great job Fay.


It is always fascinating to see what everyone is working on, what we all see in everyday objects, a photograph or the face of a friend.

Donna Vines

Tuesday, April 16, 2013

Monday, Monday

The Pieces may be small in number for the next few weeks but not in ideas and projects.  This is the time of year when summer travel starts and there are many weeks we are only half in number but never in enthusiasm or ideas.

Carmen started this painting today from her iPad.  She is such a techie.  I love the angle of this photo, the road looks endless and the sky so brooding. I may have to inclue a photo of Carmen because her hair looks so great.  She got my cancelled hair appointment when I had a stomach bug and she looks boss and I look like I just got over a stomach flu.


Mary has left her comfort zone recently and done a few abstracts which are so colorful.  This one reminds me of a stained glass window.  I think being the granddaughter of a minister has subconsciously influenced her work and made her paintings even more angelic.


I (Donna) decided to finally tackle the promised cat portrait for my brother-in-law. I have already immortalized Rambo, one of his two beautiful cats and this is the start of Rocky in all his glory.


Stay tuned  tomorrow and see what Fay and Cindy are up to besides mischief....


Sunday, April 14, 2013

CONFETTI, 5x5x1.5" Abstract triptych

Today, I am posting something new to me.....my first abstract triptych!  I really enjoyed working on this and hope to do more in the future.

110 + 12.50


I have not quite figured out how to photograph these yet...something I need to work on!


It is on three 5x5" gallery wrap canvases with the sides painted black.  Each piece is signed on the side.


It works in both a vertical or horizontal composition.


Here is a vertical view.


www.carolschiffstudio.blogspot.comwww.carolschiffstudio.blogspot.com

Friday, April 12, 2013

Sketching Downtown


On Monday the Pieces of Eight took to the streets--some painting en plein aire (outside) and others sketching in our journals. The weather was perfect and it was so peaceful. On the left side you can see the 905 Cafe, where Denette and I get the Brie Apple Nut Melt every time. Yum. The giraffes were in the window of the store Go Fish.

My journal so far has various places in Virginia, the Natchez Trace, Memphis, the Everglades, Clinton, Iowa and locations here in Brevard County, Florida. I recommend a travel journal for every artist. Fun!

Carmen

Thursday, April 11, 2013

An Illustrated Pear: Gradient Mesh

This is the fourth pear in my series on learning Illustrator. I had never really played with Mesh objects in prior versions of Illustrator but since I'm experimenting with everything while learning the CS6 version, decided to check it out. It's definitely fun, and if you are interested in using Illustrator as a painting tool, it's almost as much fun as the Blob Brush (more on that in a later entry.)

Started with my basic pear, leaf and stem from prior efforts, filled them with gradients close to what I wanted them to be colored like and started to convert them to gradient mesh objects.
Learned the hard way that if you want to convert something into a gradient mesh object, you are way ahead by starting with a solid filled object as opposed to an object that you've already filled with a gradient you like. When you select an object with a gradient already applied to it and choose Object>Create Gradient Mesh, you get an object filled with a black and white gradient. (What were they thinking when they came up with that?)  Whereas, if you start with an object filled with a solid color close to the color you want to work with, you get a gradient mesh of that color. The pear on the lower right was clearly easier to get to my goal with.


After the mesh is created, all points can be easily adjusted, rearranged and recolored. It is fun, kind of like painting! I eventually had to stop because you could go a million different directions with it. You can keep adding lines and mesh points and therefore colors endlessly. If you were really patient (which I'm not) you could create a pear that no one would know was not a photograph. My art falls way short of realism. But, I was looking at a real pear while I "painted" and it had interesting pink, green and purple areas, so I put them in.

Before I finished with the pear, I put in some dark blue colors along the bottom mesh points since I was planning a dark background that would be somewhat reflected on the pear's yellow skin. Meshed the leaf after filling it first with a solid green color and the stem with a brown.

Next I added a background and filled it with a pattern I'd created earlier. Jazzed up the border with a little scribble effect. Also added some spots for texture to it by creating a little "Art brush" of varying dots and colors that I could see on my real pear.

Painting the mesh was fun. It's not my usual style, but the effect is really nice and easy to achieve. Glad I tried it.

Coming up next - a summary pear created from all the little things I love to use in Illustrator.

Monday, April 8, 2013

Pacific Bliss, 6x12" Original Oil

It always amazes me how different the Atlantic is from the Pacific.  Here, on the east coast, we have mornings when the ocean looks like a big lake, hardly a ripple breaks the surface.

$12 + 8
I don't have as much experience with the west coast, but it appears to be much more intense.  I have only been to the Pacific in northern California, where it is a deep, beautiful blue, unlike the semi-tropical waters we have in Florida, which can be a bright turquoise.


The reference image for this painting came from Shelly Smart's blog, A Year at the Beach.  She is not posting it anymore, but it remains a fascinating journal.  She posted images of her beach every day for a year.  Thank you Shelly, for sharing your images with me.


www.CarolSchiffStudio.blogspot.com

Sunday, April 7, 2013

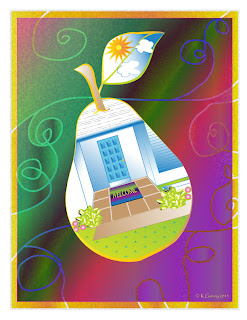
An Illustrated Pear: Masking

Third in my series of learning Illustrator CS6 was a study of masking. Again, I used a pear for the design element, this time copying my pear from the prior illustration and just modifying the leaf shape slightly. I filled it in with a little gradient and pattern and rotated it. I also added a variable width stroke in gold to the pear and stem. (Love some of these new features that I have missed out on by stopping at CS3.)

But the goal was to fill the shape with something more complex, so I decided to frame my front door with the pear shape and call it Home Sweet Pear.
 Using some of the fun tools  (available in many prior versions) in Illustrator, like Divide Into Grid I was able to build a copy of my front door and then use blends to create the wooden panels.  Divide into Grid also helped create the slats on the hurricane shutters and the squares on the tile entry.
After the little smidgen of landscape that would show was added by creating symbols of leaves and flowers, I copied the shape of the pear to the top of the layer, selected the layer and clicked on the Create Layer Mask Icon at the bottom of the Layer Panel. Presto! All the little edges and things that don't fit get perfectly covered up by the pear shape! (I love masks - in Illustrator and Photoshop they give you such beautiful results and make jobs that would be difficult so simple.) Rotated the view to match the pear's rotation. Then created a little sunshine and clouds for the leaf and masked them in the same way.

Things are still easily added into the clipping mask just by dragging them into that layer so I built a welcome mat, and dragged it to the pear layer.

Added a background of rectangles filled with gradients and cut them up with the knife tool.

Next, tackling Mesh!

Wednesday, April 3, 2013

An Illustrated Pear: Pattern Brushes

This is another pear in my series of learning what's new in Illustrator CS6. I wanted to try some of the new pattern brushes.  I built both pear and leaf shapes and then created a series of arcs and positioned them over the pear. Then I selected an Arc and chose Edit>Path>Divide Objects Below to cut the pear along the arc. I continued that for each arc until the pear was cut into a series of stripes.
I then filled each stripe with color and placed another arc on top and applied one of the new pattern brushes that came with Illustrator - there are so many! A clipping mask keeps the patterns from extending beyond the edge of the pear. Since it looked so much like a Christmas ornament, used two rounded rectangles and a circle filled with gradients to create a hanger.  (Click to enlarge.)
Created a gradient background and cut it up with the knife tool. Added a few more gradient layers to create a little more drama for the background and to imply it's hanging in a Christmas tree.
There are so many pattern brushes that come with Illustrator, and they are so easy to create, that one could build hundreds of ornaments and they'd all be unique.

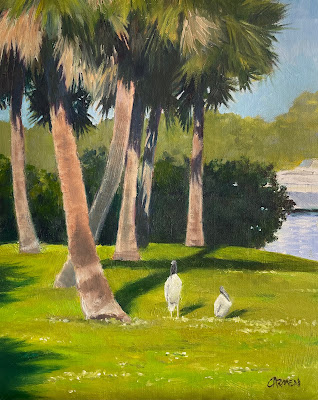
Ballard Park, Original Oil on Canvas

  I had not painted outside in two years, so this was quite a challenge. It was one of those paintings I had to improve upon in the studio. ...